Laying square tiles
 Audio for slide 1 (mp3 |6|KB)
Once the working lines have been marked out on the floor, you can start the process of laying the tiles.
Some manufacturers recommend that the tiles be removed from the box and allowed to acclimatise for 24 to 48 hours at room temperature before they're laid.
This helps to ensure that the dimensions won't change after they've been placed in position.

 Audio for slide 2 (mp3 |6|KB)
You can also 'dry lay' a single row along your working lines if you want to check the width of the perimeter tiles around the walls.
Remember that the perimeter tiles should be at least one third of the full-tile width, and that doorways and high traffic areas should have full tiles where possible.
 Audio for slide 3 (mp3 |6|KB)
Spreading the adhesive
Spread the adhesive on the floor, following the recommended coverage rate shown on the product label. Note that there may be some variation depending on the porosity of the surface.
You might also need to apply more adhesive to certain areas, such as rampways and high traffic thoroughfares.
The most common methods for applying the adhesive are rolling with a long nap roller or trowelling with a V notched trowel that has 1.6 mm notches.
 Audio for slide 4 (mp3 |6|KB)
Wait for the adhesive to tack up before placing the tiles in position. The adhesive colour will change from a milky white colour to a clear film, and will feel 'touch dry'. This will give you a 'releasable' bond, which is what pressure sensitive adhesives are designed to do.
In high use areas that require a permanent bond, lay the tiles before the adhesive tacks up, while it is still semi-wet.
 Audio for slide 5 (mp3 |6|KB)
Square carpet tiles should be laid using the stair method.
As you lay each tile in position, hold it from both sides and slide it into place, paying attention to the corner and sides that abut the other tiles already on the floor.
Be careful not to let the pile get trapped between the edges of two tiles.
Keep an even tension throughout the installation to ensure that the tiles don't creep out of alignment as the rows build up. Over-tensioning can also cause the tiles to buckle or peak at the joins.
Check the overall width every 10 tiles. There should be no more than 5 mm of gain in every 10 joins.
 Audio for slide 6 (mp3 |6|KB)
If you make a mistake with a tile and need to pull it up again, don't re-lay that tile. Use a new one instead so you can be sure that you've achieved a good transfer of adhesive to the backing.
Some tile manufacturers recommend that the completed installation is rolled with a weighted roller.
However, for most installations using pressure sensitive adhesive, it is normal practice to simply give each tile a quick hand rub to bed it down.
 Audio for slide 7 (mp3 |6|KB)
Cutting to size
Carpet tiles should be cut from the backing side using a utility knife with a straight blade or hook blade.
The procedure for cutting and fitting border tiles around the wall perimeter is as follows:
- Place a full tile in position (A) and another tile hard against the wall (B), overlapping the first one.
- Put nicks in the sides of tile A to mark each end of the overlap with tile B.
 Audio for slide 8 (mp3 |6|KB)
- Remove tile A, turn it over, and cut the line from the back using a straightedge as a guide.
- Apply adhesive to cover 100 % of both tiles (A and B).
- Place A against the wall with the cut edge facing the wall, and tile B in the gap between tile A and the remaining field tiles.
 Audio for slide 9 (mp3 |6|KB)
For irregular shapes or curved walls, you should make up a template out of paper or cardboard.
Once you're happy that the template profile fits snugly into the contours that you're cutting around, turn the template over and lay it on the back of the tile (or tiles).
Check that you have the pile direction facing the right way on each tile, and trace the outline onto the backing. Cut the tile to shape using a utility knife.
 Audio for slide 10 (mp3 |6|KB)
 Audio for slide 11 (mp3 |6|KB)
Installing tiles on stairs
Carpet tiles can't be installed over the nose of a stair. To carry out a stair installation, cut and install the carpet tiles to the riser first and then the stair tread. Make sure adhesive is applied to 100% of the riser and tread.
Then install a metal or rubber nosing, fixing it into position with the appropriate fasteners. The fasteners you use will depend on the substrate material and the brand of the nosing.
 Audio for slide 12 (mp3 |6|KB)
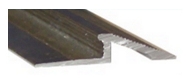
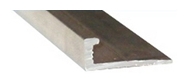
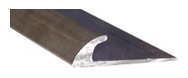
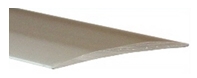
Metal and PVC trims
Trims are used to finish off the edges of the installation in doorways, on stairs, and wherever the carpet transitions to other floor surfaces.
They are generally made of anodised aluminium or PVC (polyvinyl chloride), and come in a range of colours and finishes, designed to match or complement the colour of the carpet.

Learning activity
Audio 13 (mp3 |6|KB)Below are some common aluminium trim profiles used with carpet tile installations. For each one, name the type of profile and give one example of where you would use it.